简介
我有时在 Web 上浏览信息时,会浏览 Github Trending, Hacker News 和 稀土掘金 等技术社区的资讯或文章,但觉得逐个去看很费时又不灵活。后来我发现国外有一款叫 Panda 的产品,它聚合了互联网大多数领域的信息,使用起来确实很不错,唯一的遗憾就是没有互联网中文领域的信息,于是我就萌生了一个想法:写个爬虫,把经常看的网站的资讯爬下来,并显示出来。
有了想法,接下来就是要怎么实现的问题了。虽然有不少解决方法,但后来为了尝试使用 React,就采用了 Flask + React + Redux 的技术栈。其中:
- Flask 用于在后台提供 api 服务
- React 用于构建 UI
- Redux 用于数据流管理
目前项目已经实现了基本功能,项目源码:Github 地址。目前界面大概如下:
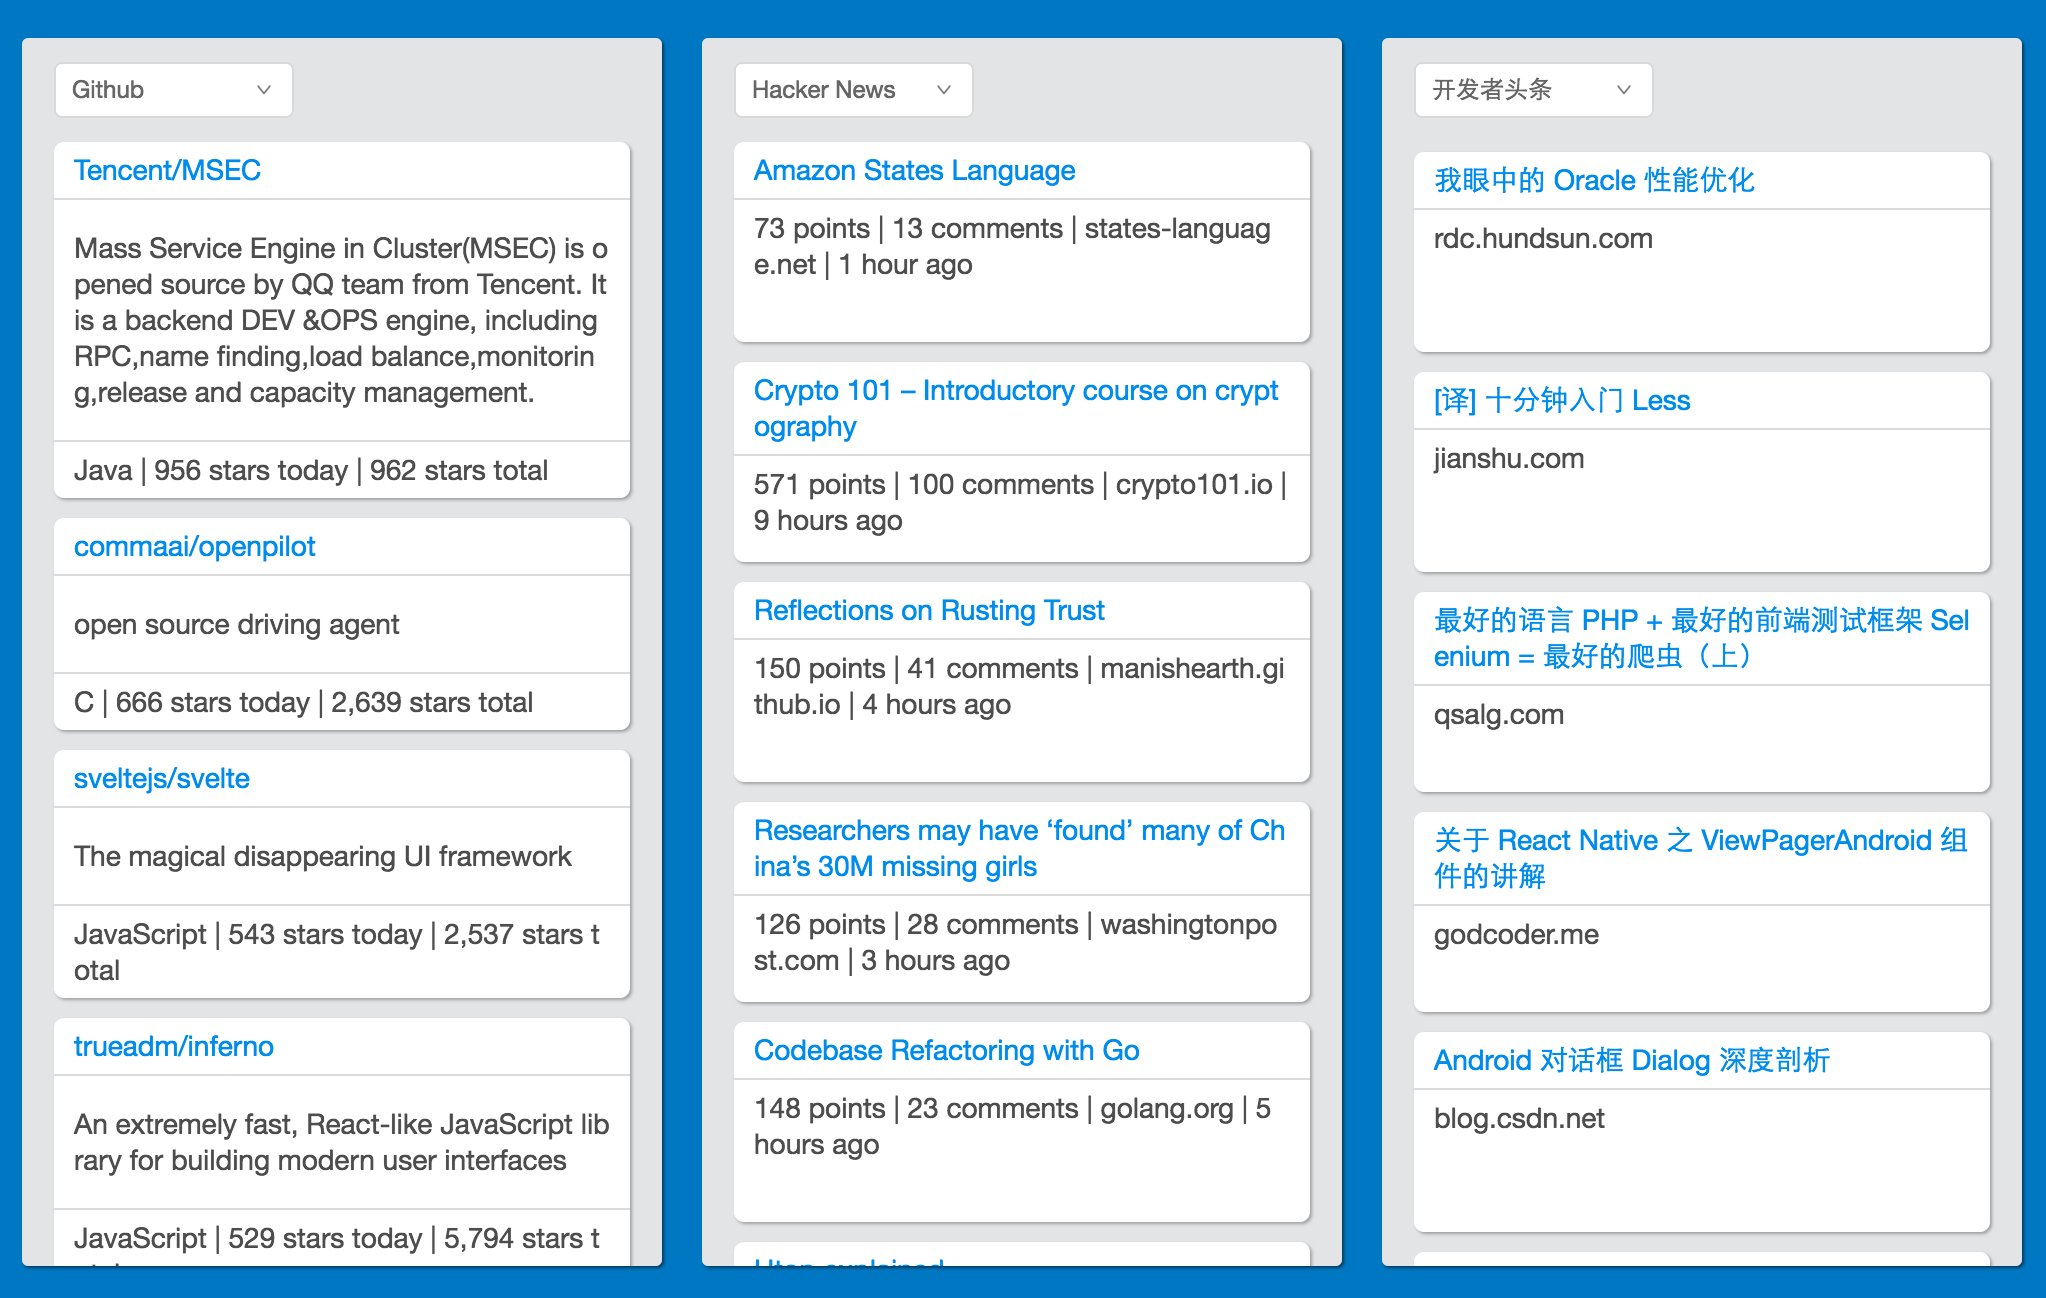
前端开发
前端的开发主要涉及两大部分:React 和 Redux, React 作为「显示层」(View layer) 用, Redux 作为「数据层」(Model layer) 用。
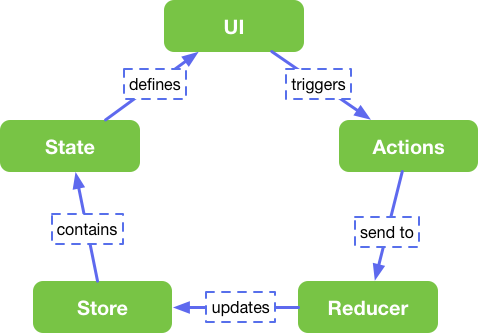
我们先总体了解一下 React+Redux 的基本工作流程,一图胜千言(该说的基本都在图里面了):
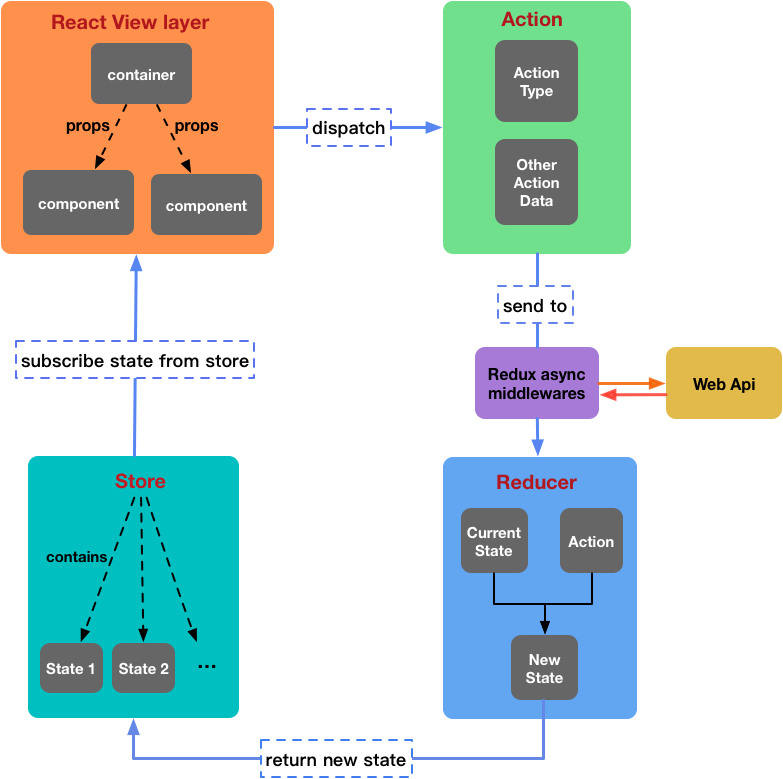
我们可以看到,整个数据流是单向循环的:
Store (存放状态) -> View layer (显示状态) -> Action -> Reducer (处理动作)
 ^                                                        |
 |                                                        |
 --------------------返回新的 State-------------------------
其中:
- React 提供应用的 View 层,表现为组件,分为容器组件( container )和普通显示组件( component );
- Redux 包含三个部分: Action , Reducer 和 Store :
- Action 本质上是一个 JS 对象,它至少需要一个元素: type ,用于标识 action ;
- Middleware (中间件)用于在 Action 发起之后,到达 Reducer 之前做一些操作,比如异步 Action , Api 请求等;
- Reducer 是一个函数:
(previousState, action) => newState,可理解为动作的处理中心,处理各种动作并生成新的 state ,返回给 Store ; - Store 是整个应用的状态管理中心,容器组件可以从 Store 中获取所需要的状态;
项目前端的源码在 client 目录中,下面是一些主要的目录:
client
    ├── actions        # 各种 action
    ├── components     # 普通显示组件
    ├── containers     # 容器组件
    ├── middleware     # 中间间,用于 api 请求
    ├── reducers       # reducer 文件
    ├── store          # store 配置文件
React 开发
React 部分的开发主要涉及 container 和 component :
- container 负责接收 store 中的 state 和发送 action ,一般和 store 直接连接;
- component 位于 container 的内部,它们一般不和 store 直接连接,而是从父组件 container 获取数据作为 props ,所有操作也是通过回调完成, component 一般会多次使用;
在本项目中, container 对应的原型如下:

而 component 则主要有两个:一个是选择组件,一个是信息显示组件,如下:
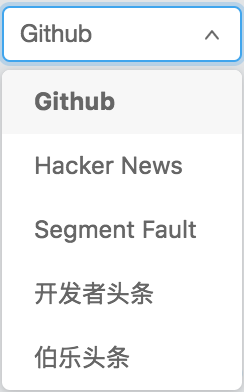
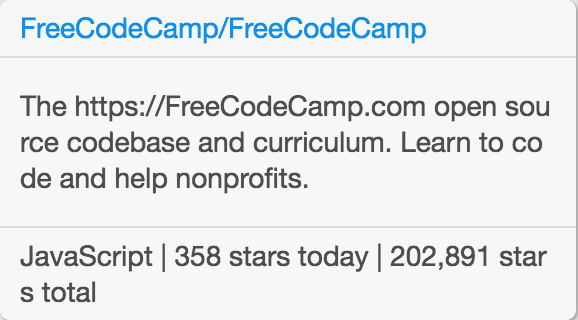
这些 component 会被多次使用。
下面,我们主要看一下容器组件 (对应 App.js) 的代码(只显示部分重要的代码):
import React, { Component, PropTypes } from 'react';
import { connect } from 'react-redux';

import Posts from '../../components/Posts/Posts';
import Picker from '../../components/Picker/Picker';
import { fetchNews, selectItem } from '../../actions';

require('./App.scss');

class App extends Component {
  constructor(props) {
    super(props);
    this.handleChange = this.handleChange.bind(this);
  }

  componentDidMount() {
    for (const value of this.props.selectors) {
      this.props.dispatch(fetchNews(value.item, value.boardId));
    }
  }

  componentWillReceiveProps(nextProps) {
    for (const value of nextProps.selectors) {
      if (value.item !== this.props.selectors[value.boardId].item) {
        nextProps.dispatch(fetchNews(value.item, value.boardId));
      }
    }
  }

  handleChange(nextItem, id) {
    this.props.dispatch(selectItem(nextItem, id));
  }

  render() {
    const boards = [];
    for (const value of this.props.selectors) {
      boards.push(value.boardId);
    }
    const options = ['Github', 'Hacker News', 'Segment Fault', '开发者头条', '伯乐头条'];
    return (
      <div className="mega">
        <main>
          <div className="desk-container">
            {
              boards.map((board, i) =>
                <div className="desk" style={{ opacity: 1 }} key={i}>
                  <Picker value={this.props.selectors[board].item}
                    onChange={this.handleChange}
                    options={options}
                    id={board}
                  />
                  <Posts
                    isFetching={this.props.news[board].isFetching}
                    postList={this.props.news[board].posts}
                    id={board}
                  />
                </div>
              )
            }
          </div>
        </main>
      </div>
    );
  }
}

function mapStateToProps(state) {
  return {
    news: state.news,
    selectors: state.selectors,
  };
}

export default connect(mapStateToProps)(App);
其中,
constructor(props)是一个构造函数,在创建组件的时候会被调用一次;componentDidMount()这个方法在组件加载完毕之后会被调用一次;componentWillReceiveProps()这个方法在组件接收到一个新的 prop 时会被执行;
上面这几个函数是组件生命周期( react component lifecycle )函数,更多的组件生命周期函数可在此查看。
react-redux这个库的作用从名字就可看出,它用于连接 react 和 redux ,也就是连接容器组件和 store ;mapStateToProps这个函数用于建立一个从(外部的) state 对象到 UI 组件的 props 对象的映射关系,它会订阅 Store 中的 state ,每当有 state 更新时,它就会自动执行,重新计算 UI 组件的参数,从而触发 UI 组件的重新渲染;
Redux 开发
上文说过, Redux 部分的开发主要包含: action , reducer 和 store ,其中, store 是应用的状态管理中心,当收到新的 state 时,会触发组件重新渲染, reducer 是应用的动作处理中心,负责处理动作并产生新的状态,将其返回给 store 。
在本项目中,有两个 action ,一个是站点选择(如 Github , Hacker News),另一个是信息获取, action 的部分代码如下:
export const FETCH_NEWS = 'FETCH_NEWS';
export const SELECT_ITEM = 'SELECT_ITEM';

export function selectItem(item, id) {
  return {
    type: SELECT_ITEM,
    item,
    id,
  };
}

export function fetchNews(item, id) {
  switch (item) {
    case 'Github':
      return {
        type: FETCH_NEWS,
        api: `/api/github/repo_list`,
        method: 'GET',
        id,
      };
    case 'Segment Fault':
      return {
        type: FETCH_NEWS,
        api: `/api/segmentfault/blogs`,
        method: 'GET',
        id,
      };
    default:
      return {};
  }
}
可以看到, action 就是一个普通的 JS 对象,它有一个属性 type 是必须的,用来标识 action 。
reducer 是一个含有 switch 的函数,接收当前 state 和 action 作为参数,返回一个新的 state ,比如:
import { SELECT_ITEM } from '../actions';
import _ from 'lodash';

const initialState = [
  {
    item: 'Github',
    boardId: 0,
  },
  {
    item: 'Hacker News',
    boardId: 1,
  }
];

export default function reducer(state = initialState, action = {}) {
  switch (action.type) {
    case SELECT_ITEM:
      return _.sortBy([
        {
          item: action.item,
          boardId: action.id,
        },
        ...state.filter(element =>
            element.boardId !== action.id
        ),
      ], 'boardId');
    default:
      return state;
  }
}
再来看一下 store:
import { createStore, applyMiddleware, compose } from 'redux';
import thunk from 'redux-thunk';
import api from '../middleware/api';
import rootReducer from '../reducers';

const finalCreateStore = compose(
  applyMiddleware(thunk),
  applyMiddleware(api)
)(createStore);

export default function configureStore(initialState) {
  return finalCreateStore(rootReducer, initialState);
}
其中,applyMiddleware() 用于告诉 redux 需要用到那些中间件,比如异步操作需要用到 thunk 中间件,还有 api 请求需要用到我们自己写的中间件。
后端开发
后端的开发主要是爬虫,目前的爬虫比较简单,基本上是静态页面的爬虫,主要就是 HTML 解析和提取。如果要爬取稀土掘金和知乎专栏等网站,可能会涉及到登录验证,抵御反爬虫等机制,后续也将进一步开发。
后端的代码在 server 目录:
server
    ├── __init__.py
    ├── app.py            # 创建 app
    ├── configs.py        # 配置文件
    ├── controllers       # 提供 api 服务
    └── spiders           # 爬虫文件夹,几个站点的爬虫
后端通过 Flask 以 api 的形式给前端提供数据,下面是部分代码:
# -*- coding: utf-8 -*-

import flask
from flask import jsonify

from server.spiders.github_trend import GitHubTrend
from server.spiders.toutiao import Toutiao
from server.spiders.segmentfault import SegmentFault
from server.spiders.jobbole import Jobbole

news_bp = flask.Blueprint(
    'news',
    __name__,
    url_prefix='/api'
)

@news_bp.route('/github/repo_list', methods=['GET'])
def get_github_trend():
    gh_trend = GitHubTrend()
    gh_trend_list = gh_trend.get_trend_list()

    return jsonify(
        message='OK',
        data=gh_trend_list
    )

@news_bp.route('/toutiao/posts', methods=['GET'])
def get_toutiao_posts():
    toutiao = Toutiao()
    post_list = toutiao.get_posts()

    return jsonify(
        message='OK',
        data=post_list
    )

@news_bp.route('/segmentfault/blogs', methods=['GET'])
def get_segmentfault_blogs():
    sf = SegmentFault()
    blogs = sf.get_blogs()

    return jsonify(
        message='OK',
        data=blogs
    )

@news_bp.route('/jobbole/news', methods=['GET'])
def get_jobbole_news():
    jobbole = Jobbole()
    blogs = jobbole.get_news()

    return jsonify(
        message='OK',
        data=blogs
    )
部署
本项目的部署采用 nginx+gunicorn+supervisor 的方式,其中:
- nginx 用来做反向代理服务器:通过接收 Internet 上的连接请求,将请求转发给内网中的目标服务器,再将从目标服务器得到的结果返回给 Internet 上请求连接的客户端(比如浏览器);
- gunicorn 是一个高效的 Python WSGI Server ,我们通常用它来运行 WSGI (Web Server Gateway Interface , Web 服务器网关接口) 应用(比如本项目的 Flask 应用);
- supervisor 是一个进程管理工具,可以很方便地启动、关闭和重启进程等;
项目部署需要用到的文件在 deploy 目录下:
deploy
    ├── fabfile.py          # 自动部署脚本
    ├── nginx.conf          # nginx 通用配置文件
    ├── nginx_geekvi.conf   # 站点配置文件
    └── supervisor.conf     # supervisor 配置文件
本项目采用了 Fabric 自动部署神器,它允许我们不用直接登录服务器就可以在本地执行远程操作,比如安装软件,删除文件等。
fabfile.py 文件的部分代码如下:
# -*- coding: utf-8 -*-

import os
from contextlib import contextmanager
from fabric.api import run, env, sudo, prefix, cd, settings, local, lcd
from fabric.colors import green, blue
from fabric.contrib.files import exists

env.hosts = ['[email protected]:12345']
env.key_filename = '~/.ssh/id_rsa'
# env.password = '12345678'

# path on server
DEPLOY_DIR = '/home/deploy/www'
PROJECT_DIR = os.path.join(DEPLOY_DIR, 'react-news-board')
CONFIG_DIR = os.path.join(PROJECT_DIR, 'deploy')
LOG_DIR = os.path.join(DEPLOY_DIR, 'logs')
VENV_DIR = os.path.join(DEPLOY_DIR, 'venv')
VENV_PATH = os.path.join(VENV_DIR, 'bin/activate')

# path on local
PROJECT_LOCAL_DIR = '/Users/Ethan/Documents/Code/react-news-board'

GITHUB_PATH = 'https://github.com/ethan-funny/react-news-board'

@contextmanager
def source_virtualenv():
    with prefix("source {}".format(VENV_PATH)):
        yield

def build():
    with lcd("{}/client".format(PROJECT_LOCAL_DIR)):
        local("npm run build")

def deploy():
    print green("Start to Deploy the Project")
    print green("=" * 40)

    # 1. Create directory
    print blue("create the deploy directory")
    print blue("*" * 40)
    mkdir(path=DEPLOY_DIR)
    mkdir(path=LOG_DIR)

    # 2. Get source code
    print blue("get the source code from remote")
    print blue("*" * 40)
    with cd(DEPLOY_DIR):
        with settings(warn_only=True):
            rm(path=PROJECT_DIR)
        run("git clone {}".format(GITHUB_PATH))

    # 3. Install python virtualenv
    print blue("install the virtualenv")
    print blue("*" * 40)
    sudo("apt-get install python-virtualenv")

    # 4. Install nginx
    print blue("install the nginx")
    print blue("*" * 40)
    sudo("apt-get install nginx")
    sudo("cp {}/nginx.conf /etc/nginx/".format(CONFIG_DIR))
    sudo("cp {}/nginx_geekvi.conf /etc/nginx/sites-enabled/".format(CONFIG_DIR))

    # 5. Install python requirements
    with cd(DEPLOY_DIR):
        if not exists(VENV_DIR):
            run("virtualenv {}".format(VENV_DIR))
        with settings(warn_only=True):
            with source_virtualenv():
                sudo("pip install -r {}/requirements.txt".format(PROJECT_DIR))

    # 6. Config supervisor
    sudo("supervisord -c {}/supervisor.conf".format(CONFIG_DIR))
    sudo("supervisorctl -c {}/supervisor.conf reload".format(CONFIG_DIR))
    sudo("supervisorctl -c {}/supervisor.conf status".format(CONFIG_DIR))
    sudo("supervisorctl -c {}/supervisor.conf start all".format(CONFIG_DIR))
其中,env.hosts 指定了远程服务器,env.key_filename 指定了私钥的路径,这样我们就可以免密码登录服务器了。根据实际情况修改上面的相关参数,比如服务器地址,用户名,服务器端口和项目路径等,就可以使用了。注意,在部署之前,我们应该先对前端的资源进行加载和构建,在 deploy 目录使用如下命令:
$ fab build
当然,你也可以直接到 client 目录下,运行命令:
$ npm run build
如果构建没有出现错误,就可以进行部署了,在 deploy 目录使用如下命令进行部署:
$ fab deploy
总结
-
本项目前端使用
React+Redux,后端使用Flask,这也算是一种比较典型的开发方式了,当然,你也可以使用Node.js来做后端。 -
前端的开发需要知道数据的流向:
- 后端的开发主要是爬虫, Flask 在本项目只是作为一个后台框架,对外提供 api 服务;
参考资料
1
WJackson 2016-12-06 10:32:11 +08:00
太赞了.!
|
2
qiu0130 2016-12-06 10:36:42 +08:00
mark.
|
3
kaka826 2016-12-06 10:58:34 +08:00
赞!建议是否可以缓存爬取结果, 不用每次请求都去爬取
|
4
ideascf 2016-12-06 13:32:37 +08:00
good job!
|
6
shenxian 2016-12-06 14:13:48 +08:00
这文档,赏心悦目~
|
7
sudoz 2016-12-06 14:25:46 +08:00
非常棒!这样从前到后一条龙很完整,后端爬虫再完善下,学习了!
|
10
cheetah 2016-12-06 15:01:56 +08:00
挺好的
|
11
lointo 2016-12-06 15:25:59 +08:00 via Android
很赞,👍,
|
12
wubotao 2016-12-06 15:50:18 +08:00
赞!马一个。
|
13
sopato 2016-12-06 15:50:30 +08:00
写得实在赞,很明显能看出大大是用心在写作。
|
16
pipecat 2016-12-06 15:59:44 +08:00 via iPhone
太赞
|
17
geekaven 2016-12-06 16:09:48 +08:00
赞!
|
18
BBrother 2016-12-06 16:10:35 +08:00
感谢! mark
|
19
bonfy 2016-12-06 16:16:50 +08:00
赞!文档咋就写得这么好呢
|
20
jeanim 2016-12-06 16:23:18 +08:00
mark
|
21
moe3000 2016-12-06 16:35:22 +08:00
赞!菜鸟顺便问一下,前端的工作流程图制作软件是什么?
|
22
sun1534 2016-12-06 16:59:52 +08:00
未入门的 Python 爱好者收藏下
|
23
mordecai 2016-12-06 17:01:18 +08:00
不错
|
24
iMmatrix OP @moe3000 ,我是使用 macOS 上的 OmniGraffle ,如果你用 windows ,可以考虑 Visio 。
|
28
akavir 2016-12-06 20:57:08 +08:00
mark
|
29
shisaq 2016-12-06 22:07:21 +08:00
Awesome!!!
|
30
alexapollo 2016-12-06 22:25:16 +08:00
前端每过一年复杂度乘 2
|
31
alexgor 2016-12-06 23:08:27 +08:00 via Android
@alexapollo 哈哈哈哈哈
|
32
corona 2016-12-06 23:17:17 +08:00 via iPhone
不错,我也有这个想法。👍
|
33
guanghao11 2016-12-07 00:06:14 +08:00
看着舒服,文档写的好,代码质量也有保障。
|
34
iMmatrix OP @guanghao11 ,谢谢!
|
35
allencode 2016-12-07 08:43:36 +08:00
厉害了,感谢。
|
36
bomb77 2016-12-07 10:24:15 +08:00
很棒,赞一个
|
38
walk1ng 2016-12-07 17:34:52 +08:00
棒!
|